
Varenyky
By Tyler Thull • May 2, 2018
Varenyky
My family has a long standing tradition of birthday suppers. On our birthdays, my sisters and I were allowed to choose any meal we could dream of, and our mother would make it with us. My big sister always chose shrimp and grits or Irish corned beef and colcannon. My little sister chose to make different variations of her favorite grouper dish every year. My birthday is in fall, right around the time when it starts to get chilly outside. Around this time of year, I always want warm, comforting food. My usual rotation of birthday main courses is steak, split pea soup, and Russian varenyky.
When I asked for varenyky- about once every three years as per the rotation, my mother would procure a giant blue package of potato and cheddar dumplings from the frozen section of the grocery store. The package was labeled Mrs. T’s Pierogies, and it was marketed as a Ukrainian dish. It is still unclear if varenyky were first made in Russia or the Ukraine, but since the Ukraine was once part of Russia, varenyky are considered to be a Russian dish. In Russia, varenyky dumplings are commonly filled with cabbage, lamb, pork, beef, and potatoes and cheese. On my birthday, my mother would serve the Mrs. T’s dumplings with shiny, golden bacon onion sauce and generous dollops of sour cream. Birthday varenyky are one of my all-time favorite comfort foods.
I love the dumplings I grew up eating, but I wondered if it was possible to make them better by making them from scratch. I followed a recipe for potato and cheese varenyky that I found on a website called Natasha’s Kitchen. Getting this recipe right was an adventure. Making the dough and the filling was pretty foolproof, but learning the repetitive technique of filling and folding the dumplings was much trickier than I expected. It took some experimentation to get it right, but oh MAN when I finally got to bite into one of those cheesy, velvety dumplings, I was in heaven. This recipe is also great because you can boil enough for supper and freeze the rest for later.
Instructions
Rolling, stretching, filling, and folding varenyky is a repetitive, meditative process. Start by making the dough and allowing it to rest. Then make the cheesy potato filling. As the filling cools, roll out the dough into thin sheets and cut it into circles. Spoon filling into each circle and pinch the dumplings closed. Last, boil the varenyky until they float, and then brown them in a bacon and onion sauce just before serving.
Making the dough
The simple ingredients of flour, eggs, sour cream, and milk come together to make an elastic, malleable dough that feels like a mix between rubber bands and playdoh. To make the dough, combine the egg, 2 tbsp. of sour cream, 1 cup of whole milk, and 1 cup of water with a whisk in a large bowl. When those ingredients are well incorporated, mix in the 5 cups of flour, one cup at a time. When I made this recipe, the dough got caught in the tines of my whisk after I added the third cup of flour, so it may be helpful to switch to stirring with a wooden spoon.

Once all of the flour is incorporated, dump the dough onto a clean, flour-dusted countertop. Knead it for six to ten minutes, until it is smooth and elastic. Do not add lots more flour, but do keep the countertop and your hands coated in flour as you knead. This will keep the dough from sticking. Kneading is a technique that lots of people do differently, however I use my knuckles and gently punch the dough down and away from me again and again. After kneading, any clumps of flour that were not initially mixed with the wooden spoon should be absorbed, and the dough should be a consistent pale yellow color.
Leave the dough on the flour-dusted countertop, and cover it with the large bowl you mixed it in to keep the air out. Allow the dough to rest for about an hour or just until you have finished preparing the filling. The timing is not an exact science, but the dough does need time to sit so that the starch molecules in the flour can fully absorb the liquid components of the mixture. This will ensure that the dough is elastic enough to be stretched thin and boiled without breaking.
Making the filling:
Wash and peel 10 medium russet potatoes. Chop them into evenly-sized pieces. It does not really matter exactly how large the pieces are, as long as they are all the same size. Put them in a large pot, cover them with water and ¾ tbsp. salt, and bring them to a boil. Boil them for about 15 minutes until they can be stuck through easily with a fork.
I deviated from the recipe I found online a little by adding sautéed onions. I read a few other potato varenyky recipes online and in Russian cookbooks, and some of them said to add onion. When given the option, I always like to pack in more flavor. While the potatoes boil, dice one medium yellow onion. Sauté the onion in a pan with butter until it is soft, translucent, and beginning to caramelize.
Drain the potatoes, and mash them while they are hot. I did not have a potato masher, so I used a large metal spoon. If the potatoes are cooked enough, they should be easy to mash with any utensil. Once the potatoes are mashed, add the sour cream, shredded mozzarella cheese, and butter, and mix until all of the ingredients have melted together. Stir in the cooked onions, and let cool.

Forming the Varenyky
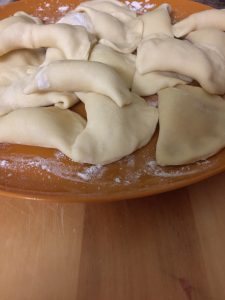
I found it easiest to cut the dough into four equal sections because my counter was small. I used a knife to divide the dough and set three sections aside. I rolled the fourth section out flat with a flour-dusted wooden rolling pin. The trick for getting the varenyky to hold lots of filling without being too tough is to roll the dough to be about 1/8th inch thick. I used a ruler to measure to make sure I had the right thickness. Once the dough was flattened out, I used the rim of a mason jar lid to cut circles.


Some Russian traditional cooks claim that this rolling and cutting method is blasphemous and swear that dough must not be rolled out in a sheet, but instead must be pinched off and hand-formed, one piece at a time. This method likely stems from food shortages in Russia’s history that would have caused cooks to see trimmings from cutting circles as incredibly wasteful. I had lots of flour and limited time, so I chose to follow a more non-traditional path for my circle forming process.
Once the circles are formed, thin each one out again with the rolling pin. I learned to do this because my first batch came out with super thick pasta coatings. They were not as yummy as the dumplings I made with thinner pasta. Scoop about a teaspoon of potato filling into each dumpling, and fold them over. Pinch the edges of the dough together, starting in the middle and working out to the edges. Make sure that the pasta completely covers the filling and that there are no holes. If there is a hole in the varenyky when you boil them, the potato filling will leak out and turn the water all starchy. You will be left with a glob of empty pasta. (Yes, I learned this from experience. The pasta needs to be thin, but not too thin.)

Place the varenyky on a flour-dusted plate or tray. From here, you can either freeze them on a sheet pan and then package them for later consumption once they are frozen solid, or you can immediately cook them to serve.
To cook them, drop them into boiling water. When they float, boil for two more minutes, then remove them with a slotted spoon.
Zazharka Sauce
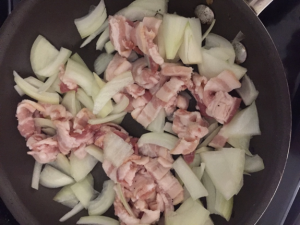
The first night that I made the Natasha’s Kitchen varenyky recipe, I followed it exactly and just put the zazharka on top of the boiled varenyky. I put butter in the sauce, just like the recipe suggested. I found that the butter added extra calories without extra flavor. The bacon grease provided ample fat for cooking the onion, so I think the butter can be avoided.
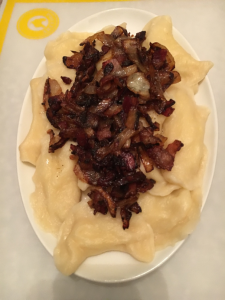
I deviated from the topping recipe the second night I ate the varenyky. I made it the way my mother taught me instead. She would chop a few pieces of bacon or pork belly, depending on what she had, cook them in a large skillet until they released their grease, and toss in a roughly chopped onion or two. She would sizzle this down until the onions were perfectly golden and caramelized, then she would add the just-boiled dumplings to the pan.
She would sauté the dumplings in the bacon drippings and onion until they were lightly crisp and golden on both sides. I like the extra texture that this method provides, so I highly suggest it. It worked very well with the homemade varenyky.
Pairing suggestions
I am not old enough to offer pairing suggestions for adult beverages, but I can offer pairing suggestions for side dishes. Traditional Russian cuisine includes vegetables that grow in the cold. It does not include green salads at all. Russians passionately hate lettuce. Instead, Russian people prefer cabbage for the green component of their plates. My mother used to pair varenyky with cabbage and apples and onions that she cooked down in a cast iron skillet with a healthy helping of butter. This is by far the greatest side dish for dumplings in the history of the world. The sweet apples and the mellow, hydrating cabbage lighten up the heavy, velvety dumplings. To please my big, burly father who liked meat at every meal (much like the Soviets), my mother would also cook up a skillet of spicy Conecuh sausage.
Recipe from Natasha’s Kitchen
Vareniki with Potatoes and Cheese – Вареники
Prep time: 1 hour 35 mins
Cook time: 25 mins
Total time: 2 hours
Visit NatashasKitchen.com for the vareniki (pierogi) dough recipe: https://natashaskitchen.com/2011/05/09/russian-pelmeni-recipe-new-dough-recipe/
Author: Natasha of NatashasKitchen.com
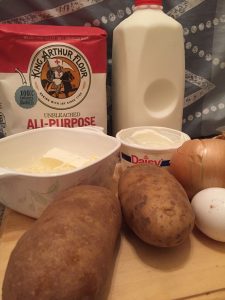 Ingredients for Potato Filling:
- 10 medium potatoes
- ¾ Tbsp salt for cooking potatoes
- ¾ cup mozzarella cheese, finely grated
- ½ package (4 oz) of cream cheese, at room temperature
- 3 Tbsp butter, melted
- *I added 1 tbsp of butter and 1 medium yellow onion
Ingredients for Zazharka:
- ½ package of bacon (6 oz), chopped
- ½ medium onion, finely diced *I rough chopped the onion here because that is how my mother made the zazharka when I was a kid.
- 2-3 Tbsp butter (depending on how many vareniki you’ve made).
Instructions
How to Make Cheesy Potato Filling:
- Peel and chop potatoes into ½-inch slices.
- Place potatoes in a medium pot and fill with enough water to almost cover potatoes and add ¾ Tbsp salt.
- Bring potatoes to a boil and cook for about 15 minutes, or until potatoes are easily pierced with a fork.
- Drain potatoes and remove from heat. Let potatoes cool for 5 minutes, then mash and stir in 3 tbsp melted butter. Mix in the cream cheese and mozzarella cheese. Mixing potatoes with a potato masher (also, the paddle attachment in an electric standing mixer makes it easy).
- Bring a large pot of water to boil with 1 Tbsp salt. Add dumplings and cook until they float to the top and an additional couple minutes, stirring occasionally to make sure they don’t stick to the bottom. Remove with a slotted spoon. The full recipe makes about 4 batches so cook each batch separately in the same water.
- To make “zazharka,” saute bacon until it releases its fat, add onion and saute until golden. Add butter and stir until melted. Drizzle over finished vareniki.
Notes
Note: You can freeze leftover uncooked pierogies by putting the on a flour-dusted cutting board and put them in the freezer. Once they are frozen, you can place them in a large zip-loc bag. Pre-freezing them like this keeps them from sticking together in the freezer.